
There’s something comforting about wrapping up a busy day with a simple treat that feels just right. Whether it’s a slow weekend afternoon or a moment of quiet during a hectic week, these walnut brownies fit perfectly into the routine. With their rich, fudgy texture and the satisfying crunch of toasted walnuts, they offer a blend of simplicity and warmth. This recipe is a straightforward way to bring a little bit of joy into everyday life, welcoming you into the kitchen to create something delightful.
Why You’ll Love This Walnut Brownies
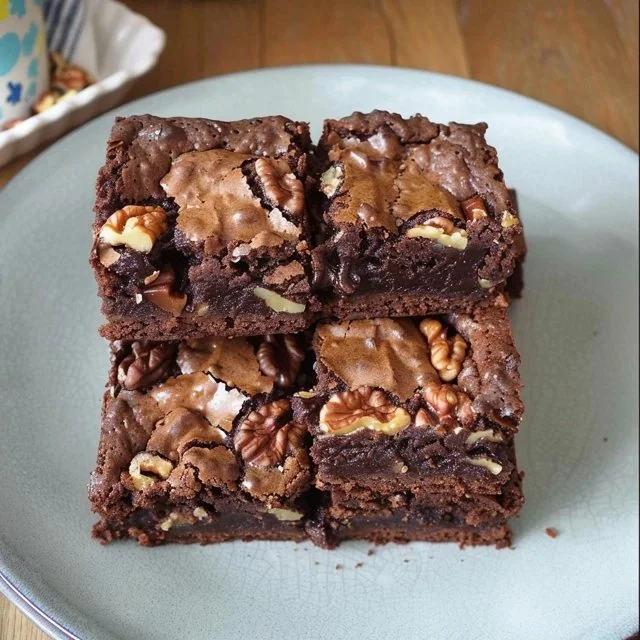
These walnut brownies are effortlessly easy to make and provide a reliable dessert that hits the spot. Their rich flavor balances the sweetness of the sugars and cocoa powder with the nuttiness of walnuts, creating a comforting treat for any occasion. This recipe offers practical everyday value, ensuring that a delicious dessert is always within reach.
Kitchen Tools You’ll Need
- Whisk
- Mixing bowls
- Baking pan
- Parchment paper (optional)
- Rubber spatula
Ingredients
- 10 tablespoons (140 grams) unsalted butter, sliced (adds moisture and richness)
- 2 cups (340 grams) semisweet chocolate chips, divided (provides sweetness and texture)
- 3/4 cup (165 grams) brown sugar (brings moisture and deep flavor)
- 3/4 cup (150 grams) granulated sugar (adds sweetness)
- 1/2 cup (40 grams) unsweetened cocoa powder (intensifies chocolate flavor)
- 3 large eggs (150 grams) (binds ingredients and adds structure)
- 1 teaspoon (5 grams) pure vanilla extract (enhances flavor)
- 1/4 teaspoon salt (balances sweetness)
- 3/4 cup (90 grams) all-purpose flour (provides structure)
- 1 cup (112 grams) chopped walnuts, toasted (adds crunch and nuttiness)
- 1/2 cup (56 grams) walnut halves (for presentation and texture)

How to Make Walnut Brownies
Step 1. Start by preheating your oven to a temperature that creates the right balance for baking. Grease a baking pan, ideally an 8×8 inch, or line it with parchment paper to ensure the brownies can be easily removed later. This preparation helps to prevent sticking and ensures even baking.
Step 2. Melt the butter in a medium saucepan over low heat, watching closely until it’s fully liquid. Add in 1 ½ cups of the chocolate chips to the melted butter, stirring continuously until these are fully melted and incorporated. The mixture should be smooth and glossy, indicating it’s ready for the next steps.
Step 3. In a separate bowl, combine both sugars, the cocoa powder, and salt. This blending allows the dry ingredients to mix evenly before adding any wet components. Stir gently until well combined, making sure there are no clumps of cocoa powder or sugar left.
Step 4. To the dry mixture, add the melted butter and chocolate blend. Stir everything together with a whisk until combined, which should create a thick, glossy batter. This step helps merge flavors and ensures the sugar begins to dissolve as the warmth from the chocolate mixture helps.
Step 5. Beat the eggs separately, then slowly incorporate them into the batter. Mix until well blended, looking for a consistency that’s smooth and slightly thickened. This step is crucial as the eggs not only bind but also add richness to the overall texture of the brownies.
Step 6. Pour in the vanilla extract and continue mixing until fully incorporated. This adds a depth of flavor that complements the chocolate. Focus on blending this mixture well, ensuring it’s evenly distributed throughout the batter.
Step 7. Sift in the all-purpose flour while folding it gently into the batter to avoid overmixing, which can lead to tougher brownies. You should see no visible flour once it’s all combined, indicating that the dry ingredients have fully integrated into the wet mixture.
Step 8. It’s time to add the toasted, chopped walnuts and the remainder of the chocolate chips into the batter. Stir carefully to ensure even distribution without overworking the batter, which maintains the fudginess of the brownies. This incorporation is where the texture starts to become more interesting.
Step 9. Transfer the batter into the prepared baking pan, smoothing the top with a rubber spatula or the back of a spoon. This creates an even surface for baking, ensuring that the brownies will rise uniformly.
Step 10. Place the pan in the preheated oven and bake. Keep an eye on it as it cooks; visual cues such as the edges pulling away slightly and a firm top will indicate they’re nearly done. Allow the brownies to cool in the pan on a wire rack before cutting them into squares.

Serving Suggestions
These walnut brownies are versatile and make for a great addition to a variety of settings. Enjoy them warm with a cup of coffee for a delightful breakfast treat, or share them as a sweet snack during the day. Whether you offer them at family meals or save leftovers for late-night indulgences, they’re sure to please. Served plain or with a scoop of vanilla ice cream, they adapt well for different occasions and preferences.
Pro Tips for Best Results
- Be careful not to overmix your batter after adding the flour to keep the brownies tender.
- For a richer flavor, consider using high-quality chocolate chips.
- Keep an eye on the baking time; the brownies are done when a toothpick inserted in the center comes out with a few moist crumbs.
- Storing brownies at room temperature keeps them soft; wrap them tightly to maintain freshness.
- Toasting walnuts enhances their flavor and adds an enjoyable crunch to the brownies.
Common Mistakes to Avoid
- Overmixing the Batter: Overworking the mixture after adding flour can create dense and tough brownies. Mix only until combined.
- Ignoring Oven Temperature: Not preheating properly can result in unevenly baked brownies. Always allow the oven to reach the desired temperature.
- Skipping the Rest Period: Cutting brownies too soon prevents them from setting properly. Allow cooling time for better texture.
- Using Cold Eggs: Cold eggs can disrupt the emulsifying process. Let them sit at room temperature before using in the recipe.
- Not Measuring Accurately: Baking is precise. Use a kitchen scale or proper measuring cups to ensure accurate ratios of ingredients.
- Baking Too Long: Leaving brownies in the oven too long can lead to dryness. Check for doneness early for a fudgier texture.
Variations & Substitutions
- You can adjust the quantity of walnuts based on your preference; use fewer or omit them entirely.
- Swap in dark chocolate chips for a richer chocolate flavor.
- For a minty twist, try adding a small amount of peppermint extract alongside the vanilla.
- Consider mixing in some chocolate chunks for a different texture.
- Experiment with adding a swirl of caramel sauce before baking for added sweetness.
Storage & Reheating
To keep your walnut brownies at their best, store them at room temperature in an airtight container for up to 3 days. For longer storage, keep them in the refrigerator for about a week. If you’d like to freeze them, wrap the brownies tightly in plastic wrap and store in an airtight container for up to 3 months. For reheating, gently warm individual brownies in the microwave for just a few seconds to maintain their fudgy texture.
Frequently Asked Questions
Can I make this recipe ahead of time?
Yes, preparing these walnut brownies ahead of time works well. You can bake them the day before and store them at room temperature, wrapped, for freshness.
How long does it last in the fridge?
Stored properly in an airtight container, brownies can last in the refrigerator for about a week, maintaining their moist texture.
Can I freeze this recipe?
Absolutely! Brownies freeze well. Wrap them tightly in plastic wrap and store them in an airtight container for up to 3 months.
What can I substitute for one ingredient?
One common substitution is using an equal amount of coconut oil for butter if you want a dairy-free option.
Why didn’t my recipe turn out as expected?
Issues can arise from ingredient measurement, mixing too much, or incorrect oven temperatures. Always measure accurately and check on your brownies as they bake.
Final Thoughts
Making walnut brownies is a rewarding experience that offers satisfying results with simplicity. From the easy blend of ingredients to the delightful textures produced, these brownies are a treat you can turn to time and again. Serve them warm or at room temperature, and enjoy a moment of comfort with each bite.

Walnut Brownies
Ingredients
Brownie Base
- 10 tablespoons unsalted butter, sliced adds moisture and richness
- 2 cups semisweet chocolate chips, divided provides sweetness and texture
- 3/4 cup brown sugar brings moisture and deep flavor
- 3/4 cup granulated sugar adds sweetness
- 1/2 cup unsweetened cocoa powder intensifies chocolate flavor
- 3 large eggs binds ingredients and adds structure
- 1 teaspoon pure vanilla extract enhances flavor
- 1/4 teaspoon salt balances sweetness
- 3/4 cup all-purpose flour provides structure
Add-ins
- 1 cup chopped walnuts, toasted adds crunch and nuttiness
- 1/2 cup walnut halves for presentation and texture
Instructions
Preparation
- Preheat your oven to 350°F (175°C) and grease an 8x8 inch baking pan or line it with parchment paper.
Melting the Chocolate
- Melt the butter in a medium saucepan over low heat. Add 1 ½ cups of the chocolate chips and stir until melted and smooth.
Mixing Dry Ingredients
- In a separate bowl, combine both sugars, cocoa powder, and salt. Stir gently until well combined.
Combining Mixtures
- Add the melted butter and chocolate mixture to the dry ingredients. Stir until combined.
- Incorporate the beaten eggs until the batter is smooth and thickened.
- Add the vanilla extract and mix until fully incorporated.
Final Mixing
- Sift in the all-purpose flour and fold gently into the batter until no visible flour remains.
- Stir in the toasted walnuts and the remaining chocolate chips.
Baking
- Pour the batter into the prepared baking pan and smooth the top. Bake in the preheated oven for about 30 minutes.
- Allow to cool in the pan on a wire rack before cutting into squares.


