
Making homemade granola bars can be a satisfying kitchen project that results in a comforting snack. These bars are perfect to enjoy during busy weeknights, lazy weekends, or even when entertaining friends. Their simple preparation and flexible ingredient list allow you to customize them to your liking, creating a deliciously practical treat. Whether you’re enjoying a quiet moment or sharing them with loved ones, you’ll appreciate the ease that comes with preparing this recipe. Let’s get started!
Why You’ll Love This easy Nut Free Granola Bars
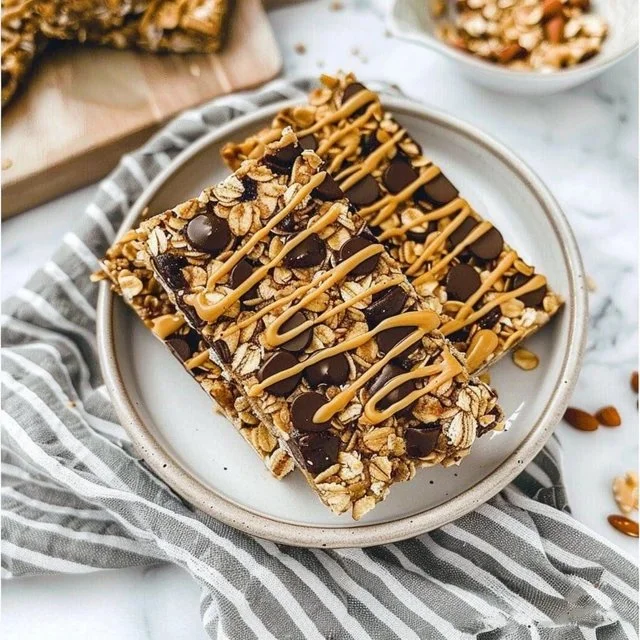
These nut free granola bars are not only easy to prepare but also consistently delicious. The combination of oats and sunflower seeds provides a comforting texture, while the mini chocolate chips add a balanced sweetness. With such practical everyday value and straightforward ingredients, this recipe offers a reliable option for snacks or breakfast. It’s a perfect way to enjoy tasty simplicity.
Kitchen Tools You’ll Need
- Mixing bowl
- Baking dish
- Spatula
- Measuring cups and spoons
- Parchment paper (optional)
Ingredients
- 2 cups old fashioned rolled oats (adds chewy texture)
- ¼ cup sunflower seeds (provides a nutty flavor and crunch)
- ¼ cup mini chocolate chips (adds sweetness and richness)
- plus more for topping
- 2 Tablespoons chia seeds (helps bind the mixture)
- ¾ cup no sugar added SunButter (adds moisture and a subtle flavor)
- ⅓ cup honey (serves as a sweetener and binder)
- 1 teaspoon vanilla (enhances overall flavor)
- ¼ teaspoon fine sea salt (balances sweetness)

How to Make easy Nut Free Granola Bars
Step 1. Start by gathering all your ingredients in a mixing bowl. This helps streamline the process and ensures you have everything ready. The combination of oats, sunflower seeds, chia seeds, and chocolate chips will create a solid base for your granola bars, with the SunButter and honey providing moisture and sweetness.
Step 2. In the bowl, add the 2 cups of old-fashioned rolled oats, ¼ cup of sunflower seeds, 2 tablespoons of chia seeds, and ¼ cup of mini chocolate chips. Gently stir them together to ensure everything is evenly distributed. Pay attention to the mixed texture, which should be a little grainy yet cohesive before adding the wet ingredients.
Step 3. In a separate bowl, mix together the ¾ cup of SunButter, ⅓ cup of honey, 1 teaspoon of vanilla, and ¼ teaspoon of fine sea salt. Stir until well combined. The mixture should have a smooth consistency, making it easier to incorporate into the dry ingredients.
Step 4. Pour the wet mixture over the dry ingredients in the first bowl. Use a spatula to fold everything together. Be sure to mix until the dry ingredients are thoroughly coated. The granola mixture should feel slightly sticky and hold together well.
Step 5. Line a baking dish with parchment paper for easy removal, if you like. Transfer the granola mixture into the dish, pressing it down firmly with the spatula. This helps the bars hold their shape after baking. Make sure the surface is even and the mixture is compacted.
Step 6. Once pressed evenly into the dish, sprinkle additional mini chocolate chips on top. This adds a touch of sweetness to the surface and enhances the visual appeal. It’s nice to have some chocolate chips melting slightly during baking.
Step 7. Preheat your oven and bake the granola bars until they’re golden brown around the edges. This visual cue indicates that they’re ready. The bars will firm up as they cool, so it’s essential to achieve a gentle browning without overcooking.
Step 8. After removing the granola bars from the oven, allow them to cool in the baking dish for a bit. Once they’re easy to handle, lift them out using the parchment paper (if used) and let them cool completely on a wire rack. This helps firm up their texture even more.
Step 9. After the bars have cooled completely, cut them into your desired size. Whether you prefer smaller snacks or larger meal replacements, each bar should hold its shape well and have a chewy texture.
Step 10. Store the granola bars in an airtight container. They’ll maintain their freshness for a while, making them a convenient grab-and-go snack. Enjoy them in various settings, from breakfast to late-night cravings.

Serving Suggestions
These nut free granola bars are incredibly versatile and can fit into different parts of your day. They make a great breakfast option when paired with a piece of fruit or a dollop of yogurt. When you need a quick snack, these bars can be satisfying enough to tide you over until your next meal. They’re also perfect for family meals, as kids and adults alike will appreciate their deliciousness. Leftovers can last for days, making them a reliable snack to have on hand.
Pro Tips for Best Results
- Press firmly: Make sure to press the granola mixture firmly into the baking dish to help the bars hold together well.
- Cool completely: Allow the granola bars to cool entirely before cutting to ensure they set properly and maintain their shape.
- Use parchment paper: Lining the baking dish with parchment paper aids in easy removal without sticking.
- Experiment with add-ins: Feel free to include other toppings or seeds as long as they fit the nut-free requirement.
- Storage methods: Store the granola bars in an airtight container in a cool, dry place to keep them fresh.
- Check the baking time: Keep an eye on the edges while baking; they should be golden but not overly dark.
Common Mistakes to Avoid
- Not pressing the mixture enough: Failing to compact the granola can lead to crumbly bars. Ensure you press down firmly before baking to promote cohesion.
- Overbaking: When the edges become too dark, the bars can become hard and dry. Bake just until golden to keep them chewy.
- Skipping cooling time: Cutting the bars too soon can result in a messy break. Let them cool fully to achieve nice, clean cuts.
- Using the wrong baking dish: A dish that’s too large may spread the mixture too thin. Stick to the suggested size for proper thickness.
- Poor mixing: If the dry and wet ingredients aren’t mixed well, you might end up with uneven flavors. Mix thoroughly to combine all flavors evenly.
- Storing improperly: Not using an airtight container can lead to stale bars. Proper storage will maintain freshness and texture.
Variations & Substitutions
Feel free to switch up the seeds based on your preferences, though keep them nut-free. You could substitute sunflower seeds with pumpkin seeds for a different flavor profile. For those who enjoy a bit of spice, adding a pinch of cinnamon can elevate the flavor. Additionally, consider using dried fruits for added sweetness and texture. Adjust the chocolate chips to your taste or even leave them out for a savory twist.
Storage & Reheating
Store your nut free granola bars at room temperature in an airtight container for about a week. If you have leftovers, you can also keep them in the refrigerator for longer-lasting freshness. For longer storage, freezing the bars is an option; wrap them individually or layer them in a safe container with parchment paper between layers. When ready to eat, you can enjoy them straight from the fridge or allow them to come to room temperature.
Frequently Asked Questions
Can I make this recipe ahead of time?
Yes, these granola bars can be made ahead of time. They store well, making them a convenient option to prepare on a quiet day and enjoy throughout the week.
How long does it last in the fridge?
When stored in an airtight container, your granola bars will last about a week in the refrigerator, retaining their freshness.
Can I freeze this recipe?
Yes, you can freeze the granola bars for longer storage. Wrap them individually or place in a container with parchment to separate layers.
What can I substitute for one ingredient?
If you need to substitute an ingredient, you can replace sunflower seeds with pumpkin seeds or omit them altogether for a simpler version.
Why didn’t my recipe turn out as expected?
Common issues can stem from under- or over-mixing or not pressing the mixture firmly enough into the pan. Make sure to follow all steps to achieve the best outcome.
Final Thoughts
Making these nut free granola bars is a straightforward process that yields satisfying results. They can be a delightful snack any time of day or a quick breakfast on busy mornings. The recipe is flexible, encouraging you to adjust to your taste. Each bite brings a comforting blend of flavors, making these bars a reliable addition to your kitchen. Enjoy the soothing experience of both making and savoring these homemade treats.

Nut Free Granola Bars
Ingredients
Dry Ingredients
- 2 cups old fashioned rolled oats adds chewy texture
- ¼ cup sunflower seeds provides a nutty flavor and crunch
- ¼ cup mini chocolate chips adds sweetness and richness
- 2 tablespoons chia seeds helps bind the mixture
- ¼ teaspoon fine sea salt balances sweetness
Wet Ingredients
- ¾ cup no sugar added SunButter adds moisture and a subtle flavor
- ⅓ cup honey serves as a sweetener and binder
- 1 teaspoon vanilla extract enhances overall flavor
Toppings
- as needed cup mini chocolate chips for topping
Instructions
Preparation
- Start by gathering all your ingredients in a mixing bowl.
- In the bowl, add the rolled oats, sunflower seeds, chia seeds, and mini chocolate chips. Stir gently to combine.
- In a separate bowl, mix together the SunButter, honey, vanilla extract, and fine sea salt until well combined.
- Pour the wet mixture over the dry ingredients and fold gently with a spatula until everything is evenly combined.
- Line a baking dish with parchment paper and transfer the granola mixture into the dish, pressing firmly to compact it.
- Sprinkle additional mini chocolate chips on top.
Baking
- Preheat your oven and bake the granola bars until golden brown around the edges, about 20-25 minutes.
Cooling and Serving
- Allow the granola bars to cool in the baking dish for a few minutes before lifting them out using the parchment paper.
- Let them cool completely on a wire rack, then cut into bars of desired size.
- Store the granola bars in an airtight container.


