
Quiet moments often call for simple yet satisfying snacks. These granola bars come together quickly, offering a balance of sweetness and crunch. Perfect for weeknights when you’re looking to unwind or on weekends for a leisurely breakfast, they make an excellent treat for gatherings and after-school munching. The best part is that they’re no-bake, making them easy and approachable for any home cook. Let’s delve into this straightforward and rewarding recipe.
Why You’ll Love This Recipe Healthy No Bake Granola Bars
These granola bars are not only easy to prepare but also bring a comforting blend of flavors and textures. The combination of crispy cereal, chewy oats, and sweet elements creates a well-rounded snack that feels indulgent yet nourishing. Their practical nature makes them a great addition to your everyday routine, whether for breakfast or a mid-afternoon boost.
Kitchen Tools You’ll Need
- Mixing bowl
- Spoon or spatula
- 9×13-inch baking pan
- Parchment paper
Ingredients
- 2 ½ cups Rice Krispies cereal (crispy texture)
- 1 cup quick-cooking oats (adds chewiness)
- ½ cup light brown sugar packed (sweetness and moisture)
- ½ cup honey (binding agent with sweetness)
- ½ cup creamy peanut butter (adds richness and structure)
- 1 teaspoon pure vanilla extract (enhances flavor)
- ½ cup mini M&Ms plus more for garnish (colorful sweetness)
- ½ cup mini Semi-Sweet Chocolate Chips plus more for drizzle (chocolate flavor)

How to Make Healthy No Bake Granola Bars
Step 1. Start by gathering all your ingredients in a mixing bowl. Adding the Rice Krispies cereal and quick-cooking oats first will ensure an even distribution of the crunchy texture with the mix of sweetness and chewiness that follows.
Step 2. In a separate bowl, combine the light brown sugar, honey, and creamy peanut butter. Mixing these ingredients together will create a smooth and sweet mixture that binds everything. Stir until the sugar is dissolved and the texture is consistent.
Step 3. Add the vanilla extract to the peanut butter mixture, stirring well to incorporate it. The vanilla will enhance the overall flavor, contributing a warming undertone. Make sure everything is evenly mixed before proceeding.
Step 4. Pour the creamy mixture into the bowl with the Rice Krispies and oats. Use a spatula to fold everything together gently. It’s important to coat each piece of cereal and oats fully, ensuring a consistent texture throughout.
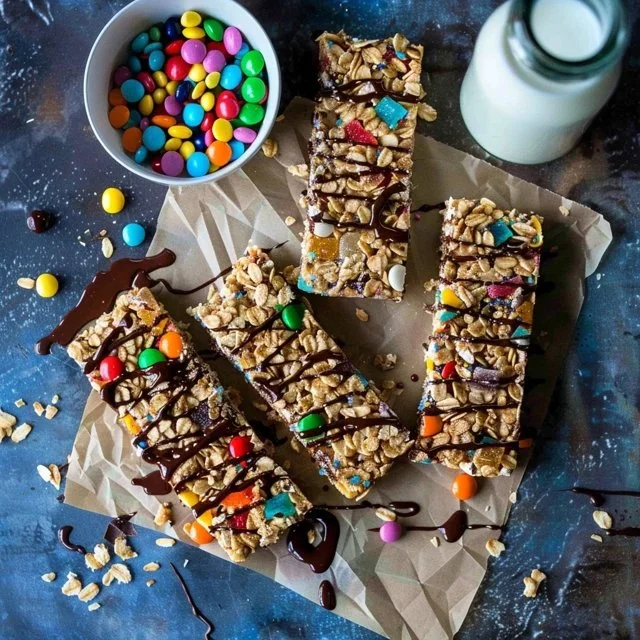
Step 5. Once combined, fold in the mini M&Ms and mini semi-sweet chocolate chips. These add bursts of sweetness and color, elevating both the visual appeal and flavor profile of the bars.
Step 6. Line a 9×13-inch baking pan with parchment paper for easier removal. Transfer the mixture into the pan, spreading it out evenly. Press it down firmly with your hands or the spatula to create a compact base—this helps the bars hold together once set.
Step 7. For the finishing touch, drizzle some additional mini semi-sweet chocolate chips on top. Melt them slightly if desired, then use a spoon to create a beautiful, swirled effect on your bars.
Step 8. Refrigerate the bars for at least an hour until they are firm. This time allows the mixture to set properly, giving you the ideal texture for slicing. Check the bars by gently pressing down—if they feel firm, they are ready to cut.

Serving Suggestions
These granola bars are versatile and make great additions to your day. Enjoy them for breakfast alongside a piece of fruit for a balanced start. They also serve well as a midday snack, providing a boost between meals. As leftovers, these bars retain their flavor and can be a quick, sweet option for family meals. Their no-bake nature also means they can be easily packed for travel or outdoor adventures.
Pro Tips for Best Results
- Press Firmly: Make sure to press the mixture firmly into the baking pan; this will help the bars hold their shape when sliced.
- Customize Toppings: Feel free to use different mix-ins or toppings for a unique twist on the flavor.
- Use Fresh Ingredients: Ensure your ingredients, especially the peanut butter, are fresh for the best flavor.
- Cut with Care: Use a sharp knife to slice the bars after chilling to create clean edges.
- Store Properly: Keep them stored in a cool place or refrigerator to maintain their freshness longer.
Common Mistakes to Avoid
- Not Pressing the Mixture Firmly Enough: Failing to compact the mixture may result in crumbly bars. Make sure to press down hard to help the bars hold together.
- Overmixing: Stirring too much once the dry and wet ingredients come together can make the texture too dense. Mix just enough until everything is well combined.
- Using Cold Peanut Butter: If the peanut butter is too cold, it won’t mix smoothly with other ingredients. Use room-temperature peanut butter for a better consistency.
- Skipping the Parchment Paper: Not lining the pan makes it difficult to remove the bars after they set. Always use parchment to make lifting them out simple.
- Forgetting the Chocolate Drizzle: Skipping this step can lead to less visual appeal. The drizzle can enhance both the flavor and overall presentation.
- Not Letting Them Chill: Trying to cut the bars before they have chilled properly can result in them falling apart. Let them set in the refrigerator as instructed.
Variations & Substitutions
Feel free to vary the mix-ins to personalize your granola bars. You might try dried fruit, sunflower seeds, or coconut flakes if those appeal to you. Adjust the amount of sweeteners like honey or sugar to your taste for a less sweet option.
Storage & Reheating
Store the granola bars in an airtight container at room temperature for up to a week. If you prefer, refrigerating them can increase their freshness. For longer storage, these bars can be frozen for up to three months. When it’s time to enjoy them, simply let them sit at room temperature for a moment; no reheating is needed.
Frequently Asked Questions
Can I make this recipe ahead of time?
Absolutely! These granola bars can be made a few days in advance. Just store them in an airtight container to keep them fresh.
How long does it last in the fridge?
If stored properly in the refrigerator, the granola bars will stay fresh for about a week.
Can I freeze this recipe?
Yes, these granola bars freeze well. Wrap them individually to make it easy to grab one later.
What can I substitute for one ingredient?
If you need to, you can swap the peanut butter for almond or sun butter, depending on your dietary needs or preferences.
Why didn’t my recipe turn out as expected?
Common reasons include not pressing the mixture firmly enough or not letting it chill long enough. Patience is key to achieving the right texture.
Final Thoughts
Making these granola bars is a straightforward process that yields delightful results. They capture a comforting blend of flavors and textures that are sure to please anyone looking for a quick snack. This recipe provides a chance to create something genuinely satisfying and practical, making it a reliable addition to your kitchen repertoire. Enjoy the simple pleasure of crafting these bars, and cherish each bite!

Healthy No Bake Granola Bars
Ingredients
Base Ingredients
- 2 ½ cups Rice Krispies cereal (crispy texture)
- 1 cup quick-cooking oats (adds chewiness)
- ½ cup light brown sugar (packed for sweetness and moisture)
- ½ cup honey (binding agent with sweetness)
- ½ cup creamy peanut butter (adds richness and structure)
- 1 teaspoon pure vanilla extract (enhances flavor)
Add-ins
- ½ cup mini M&Ms (plus more for garnish)
- ½ cup mini Semi-Sweet Chocolate Chips (plus more for drizzle)
Instructions
Preparation
- Gather all your ingredients in a mixing bowl, starting with the Rice Krispies cereal and quick-cooking oats.
- In a separate bowl, combine the light brown sugar, honey, and creamy peanut butter and mix until smooth and consistent.
- Add the vanilla extract to the peanut butter mixture and stir well to incorporate.
- Pour the creamy mixture into the bowl with the Rice Krispies and oats, and fold together gently until combined.
- Fold in the mini M&Ms and mini semi-sweet chocolate chips.
Assembly
- Line a 9×13-inch baking pan with parchment paper and transfer the mixture into the pan, spreading it evenly.
- Press down firmly with your hands or spatula to create a compact base.
- Drizzle additional mini semi-sweet chocolate chips on top, melting slightly if desired.
Setting
- Refrigerate the bars for at least an hour until firm.
- Check the bars by gently pressing down; if they feel firm, they are ready to cut.


