
Sometimes, the best way to unwind after a busy day or kickstart a quiet morning is with something homemade. These chewy granola bars, soft yet sturdy, are perfect for any time you want a wholesome snack or light meal. They fit seamlessly into your weeknight routine, weekend adventures, or even gatherings with friends. With their comforting blend of textures and flavors, they offer a reliable bite that’s easy to prepare. Let’s dive into the recipe and experience the joy of making these simple bars together.
Why You’ll Love This Chewy Gluten Free Granola Bar Recipe
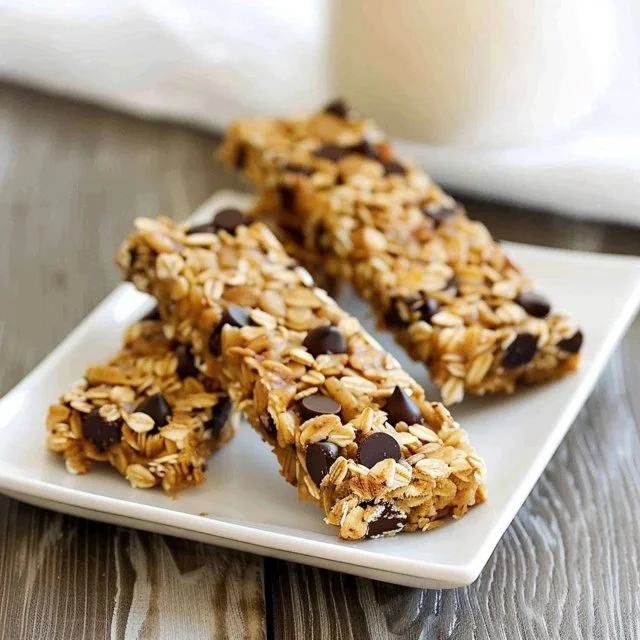
These chewy gluten free granola bars are both easy to make and reliably satisfying, giving you a comforting treat that’s balanced in flavor. With their blend of oats, nuts, and a touch of sweetness, these bars are perfect for snacking or as a quick breakfast option. They’re a practical addition to your everyday meal prep, and you’ll find they often become a go-to for busy days.
Kitchen Tools You’ll Need
- Mixing bowl
- Measuring cups
- Measuring spoons
- Baking pan
- Parchment paper (optional)
- Spoon or spatula
Ingredients
- 1 ¾ cups gluten free old-fashioned rolled oats, processed by about half (softening texture)
- 1 cup gluten free oat flour (adds structure)
- ¾ cup packed light brown sugar (or granulated coconut palm sugar) (provides sweetness and moisture)
- 1 teaspoon ground cinnamon (adds warmth)
- ¼ teaspoon kosher salt (enhances flavor)
- 1 ⅓ cups raw pecans, almonds and/or pumpkin seeds, roughly chopped (adds crunch and nutrition)
- 1 cup coconut flakes/chips (contributes chewiness and a tropical flavor)
- 8 ounces mini chocolate chips (provides sweetness and richness)
- Dried raisins and/or dried cranberries or other small dried fruit (adds natural sweetness and chew)
- 8 tablespoons unsalted butter or virgin coconut oil, melted and cooled (binds ingredients and adds richness)
- 6 tablespoons combination of honey, pure maple syrup and/or molasses (sweetener that also adds moisture)
- 1 egg, lightly beaten (helps bind the mixture)
- ½ teaspoon pure vanilla extract (adds flavor depth)

How to Make Chewy Gluten Free Granola Bar Recipe
Step 1. Begin by combining the gluten free rolled oats, gluten free oat flour, light brown sugar, ground cinnamon, and kosher salt in a large mixing bowl. Stir these dry ingredients together until they are evenly mixed. You want to ensure that the spices and sweeteners are distributed thoroughly for balanced flavor throughout the bar.
Step 2. Next, add the roughly chopped raw nuts and seeds, along with the coconut flakes or chips, to the mixture. Make sure to fold them in gently. This step adds texture and nutrition while ensuring that every bite will have a mix of flavors, from the crunch of the nuts to the chewiness of the coconut.
Step 3. Now it’s time to incorporate the mini chocolate chips along with the dried fruit. For even distribution, I like to sprinkle them evenly across the top of the mixture before folding them in. This adds bursts of sweetness and richness, giving those chewy bars a delightful surprise in every mouthful.
Step 4. In a separate bowl, mix the melted and cooled butter (or coconut oil), honey (or syrup), and the lightly beaten egg. Stir in the pure vanilla extract as well. This mixture brings together the moist elements that will hold your bars together, ensuring they are both chewy and delicious.
Step 5. Pour the wet mixture into the dry ingredients and mix everything until just combined. Be careful not to overwork the mixture. You’re looking for it to be well-moistened and cohesive without being overly blended. This step is crucial for texture; you want to maintain some integrity in the oats and nuts.
Step 6. Line a baking pan with parchment paper for easy removal later, or grease it lightly. Then, transfer the combined mixture into the pan. Gently press it down into an even layer, ensuring you pack it tightly, so the bars hold their shape after baking. The pressure helps create that chewy consistency that everyone loves.
Step 7. Bake the mixture in a preheated oven until the edges start to turn golden brown. It’s important to keep an eye on it toward the end to avoid over-baking, as this can lead to a drier texture. When done, the bars should still be slightly soft in the center and firm up as they cool.
Step 8. Once baked, allow the granola bars to cool in the pan for about 10–15 minutes. After that, you can lift them out using the parchment paper and let them cool completely on a wire rack. Cooling is essential, as it helps them set properly, making them easier to cut into neat squares or rectangles.

Serving Suggestions
These chewy granola bars make for a versatile addition to your meal options. Enjoy them for breakfast, perhaps with a warm cup of tea or coffee. They also serve well as a snack during busy afternoons, fitting nicely into lunchboxes for both kids and adults. Leftover bars can be shared during family meals or gatherings, providing a wholesome bite that everyone will appreciate. Their portability makes them perfect for hikes or picnics, bringing comfort wherever you go.
Pro Tips for Best Results
- Ensure your ingredients are truly gluten free if you have dietary restrictions.
- Use the correct proportions for binding the mixture; too much liquid can make them too soft to hold together.
- Let the bars cool completely before cutting them to prevent crumbling.
- Experiment with different combinations of nuts and dried fruit by adjusting based on personal preference.
- Store the bars in an airtight container for optimal freshness.
- If you prefer a firmer bar, consider baking them a few minutes longer, but be cautious not to burn.
Common Mistakes to Avoid
- Not processing the oats properly: If the oats are not processed by about half, the texture may be too coarse. To avoid this, pulse them in a food processor until roughly broken down but not turned into flour.
- Skipping cooling time: Cutting the bars while still warm can lead to them falling apart. Be sure to let them cool completely for the best structure.
- Overbaking: Leaving the bars in the oven too long can dry them out. Keep an eye on them, looking for a slight golden color around the edges, and remove them when they’re still a bit soft in the center.
- Using too much sugar or sweetener: Excessive sweetness can overpower the other flavors. Stick to the recommended amounts for a balanced taste profile.
- Incorrect egg preparation: Using an egg that isn’t lightly beaten can lead to uneven binding. Be sure to whisk the egg lightly before adding it to the wet ingredients.
- Not packing the mixture tightly: Failing to press the mixture down firmly in the baking pan can result in loose bars. Use a spatula to pack it down as evenly as possible to ensure they set well.
Variations & Substitutions
For a nut-free version, simply omit nuts and increase the amount of seeds. You can also swap out the dried fruits based on what you have on hand, such as dried apricots or figs. Adjusting the type of sweetener used can lead to a flavor twist; try using maple syrup for a more distinct maple flavor. Additionally, mixing in other flavorings like cocoa powder can offer a delightful change if you enjoy chocolate.
Storage & Reheating
Store your granola bars at room temperature in an airtight container for several days. If you’d like to keep them longer, refrigerate them for up to two weeks. They can also be frozen for up to three months; just wrap each bar individually for convenience. When ready to enjoy from the fridge or freezer, you can eat them cold or heat them slightly in the microwave for a few seconds to enhance their chewiness.
Frequently Asked Questions
Can I make this recipe ahead of time?
Yes, these granola bars can be made ahead of time and stored for several days. They work well for meal prep, providing nutritious snacks that are ready to grab.
How long does it last in the fridge?
When stored properly in an airtight container, these granola bars can last about two weeks in the refrigerator while maintaining their taste and texture.
Can I freeze this recipe?
Absolutely. You can freeze the granola bars for up to three months. It’s best to wrap them individually to ensure they stay fresh.
What can I substitute for one ingredient?
If you don’t have oat flour, you can blend rolled oats until they are a fine powder. Alternatively, using another gluten free flour, like almond or coconut flour, can work, but may alter the texture slightly.
Why didn’t my recipe turn out as expected?
Several factors can lead to variations in outcome, including incorrect measurements or baking time. It’s essential to follow the instructions closely and watch for visual and texture cues.
Final Thoughts
Making these chewy gluten free granola bars is a rewarding experience that results in a delightful snack for you and your loved ones. Their flexible nature allows for easy adjustments, making them a staple you can return to time and again. Enjoy the process of creating them, and rest assured knowing you’ve made something wholesome and comforting at home.

Chewy Gluten Free Granola Bars
Ingredients
Dry Ingredients
- 1 ¾ cups gluten free old-fashioned rolled oats, processed by about half Softening texture
- 1 cup gluten free oat flour Adds structure
- ¾ cup packed light brown sugar (or granulated coconut palm sugar) Provides sweetness and moisture
- 1 teaspoon ground cinnamon Adds warmth
- ¼ teaspoon kosher salt Enhances flavor
Mix-ins
- 1 ⅓ cups raw pecans, almonds and/or pumpkin seeds, roughly chopped Adds crunch and nutrition
- 1 cup coconut flakes/chips Contributes chewiness and tropical flavor
- 8 ounces mini chocolate chips Provides sweetness and richness
- Dried raisins and/or dried cranberries or other small dried fruit Adds natural sweetness and chew
Wet Ingredients
- 8 tablespoons unsalted butter or virgin coconut oil, melted and cooled Binds ingredients and adds richness
- 6 tablespoons combination of honey, pure maple syrup and/or molasses Sweetener that also adds moisture
- 1 large egg, lightly beaten Helps bind the mixture
- ½ teaspoon pure vanilla extract Adds flavor depth
Instructions
Preparation
- Combine the gluten free rolled oats, gluten free oat flour, light brown sugar, ground cinnamon, and kosher salt in a large mixing bowl. Stir until evenly mixed.
- Add the roughly chopped raw nuts and seeds, along with the coconut flakes or chips, to the mixture. Fold them in gently.
- Incorporate the mini chocolate chips along with the dried fruit. Sprinkle them evenly across the top of the mixture before folding them in.
- In a separate bowl, mix the melted and cooled butter (or coconut oil), honey (or syrup), and the lightly beaten egg. Stir in the pure vanilla extract.
Mixing
- Pour the wet mixture into the dry ingredients and mix until just combined. Be careful not to overwork the mixture.
Baking
- Line a baking pan with parchment paper or grease it lightly. Transfer the combined mixture into the pan and press it down into an even layer.
- Bake in a preheated oven until the edges start to turn golden brown, keeping an eye on it toward the end.
- Allow the granola bars to cool in the pan for about 10–15 minutes before lifting them out using the parchment paper and letting them cool completely on a wire rack.


